
Buying an old house often comes with a unique charm and character, but it can also harbor hidden dangers, such as lead-based paint. This article will guide you through the essential steps of identifying and testing for lead paint, ensuring the safety of your home and family, emphasizes B&R Property Management professionals. Understanding the risks and proper testing methods is crucial for any homeowner of an older property.
Understanding the Silent Threat: Why Lead Paint Matters
Answer Capsule: Lead-based paint, commonly found in homes built before 1978, poses significant health risks, particularly to children and pregnant women. Exposure can lead to developmental issues, neurological damage, and other severe health problems. Recognizing the historical context and legal implications of lead paint is the first step toward creating a safer living environment.
Lead paint is more than just an aesthetic concern; it represents a serious health hazard, especially in older homes. The insidious nature of lead poisoning lies in its ability to affect nearly every system in the body, often without immediate, obvious symptoms. Children are particularly vulnerable due to their developing nervous systems and tendency to put objects in their mouths, leading to higher absorption rates of lead [5]. Even low levels of lead exposure in children have been linked to reduced IQ, learning disabilities, behavioral problems, and hyperactivity [3]. For adults, lead exposure can cause high blood pressure, kidney damage, and reproductive issues [2].
The widespread use of lead-based paint before its ban in 1978 means that a significant portion of older housing stock still contains it. For instance, approximately 87% of homes built before 1940 and 24% of homes built between 1960 and 1978 are estimated to contain some lead-based paint [1]. This historical prevalence underscores the importance of testing, particularly when considering renovations or if young children reside in the home. Furthermore, legal requirements often mandate disclosure of known lead-based paint hazards when selling or renting properties built before 1978, highlighting the serious implications for homeowners and occupants alike [4].
Beyond the Surface: Identifying Potential Lead Paint Locations
Answer Capsule: Lead paint is often found in high-friction areas and on specific surfaces within older homes. Visual cues such as chipping, peeling, or chalking paint can indicate its presence. A thorough visual inspection, focusing on common problem areas and considering the age of the home, is vital for preliminary identification.
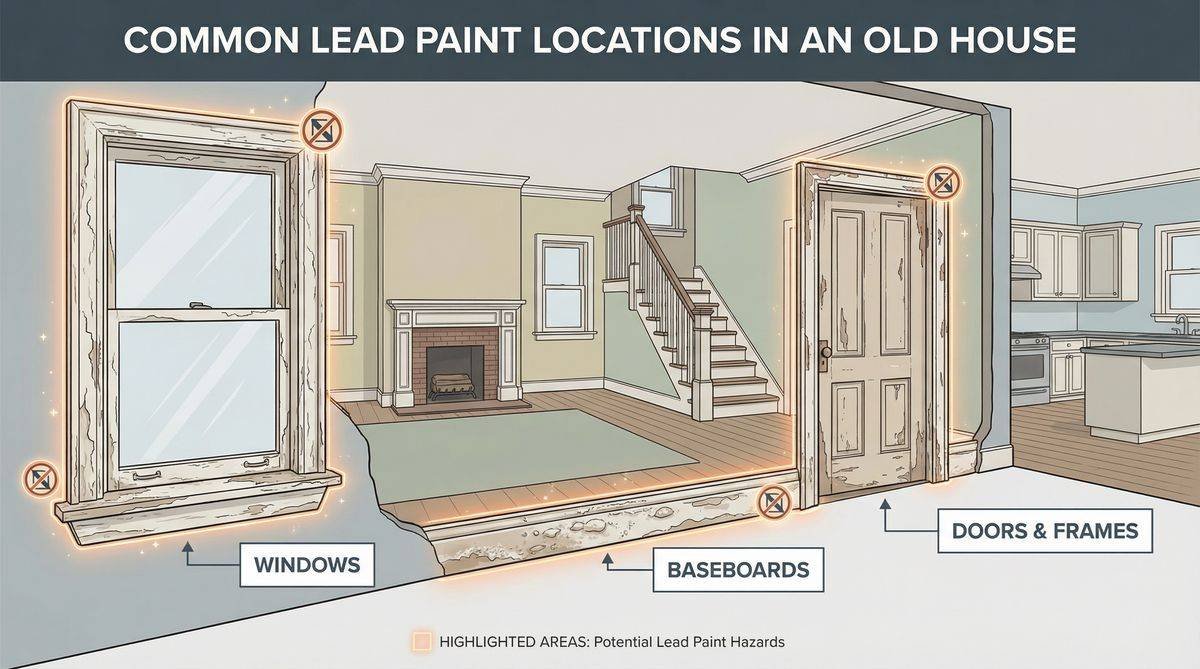
Identifying potential lead paint locations in an old house requires a keen eye and an understanding of where it was historically applied. Lead-based paint was favored for its durability and moisture resistance, making it a common choice for both interior and exterior surfaces that experienced significant wear and tear. Key areas to inspect include window sills and frames, door frames and jambs, baseboards, and trim. These are often points of friction where paint can chip, crack, or become pulverized into dust [3].
Beyond these high-traffic zones, lead paint can also be found on staircases, railings, and even on kitchen cabinets or built-in furniture. On exterior surfaces, it was frequently used on siding, porches, and fences. Visual cues are often the first indicators: look for paint that is chipping, peeling, or flaking, sometimes in a distinctive ‘alligatoring’ pattern, or a chalky residue that appears when the paint degrades [5]. If your home was built before 1978, it’s prudent to assume lead paint is present and proceed with caution, especially if you observe any of these visual indicators [2].
DIY vs. Pro: Navigating Lead Paint Testing Options
Answer Capsule: Homeowners have several options for testing lead paint, ranging from DIY kits to professional inspections. While home test kits offer a quick, affordable preliminary check, professional laboratory analysis or XRF testing provides accurate, quantitative results. Choosing the right method depends on your specific needs and desired level of certainty.
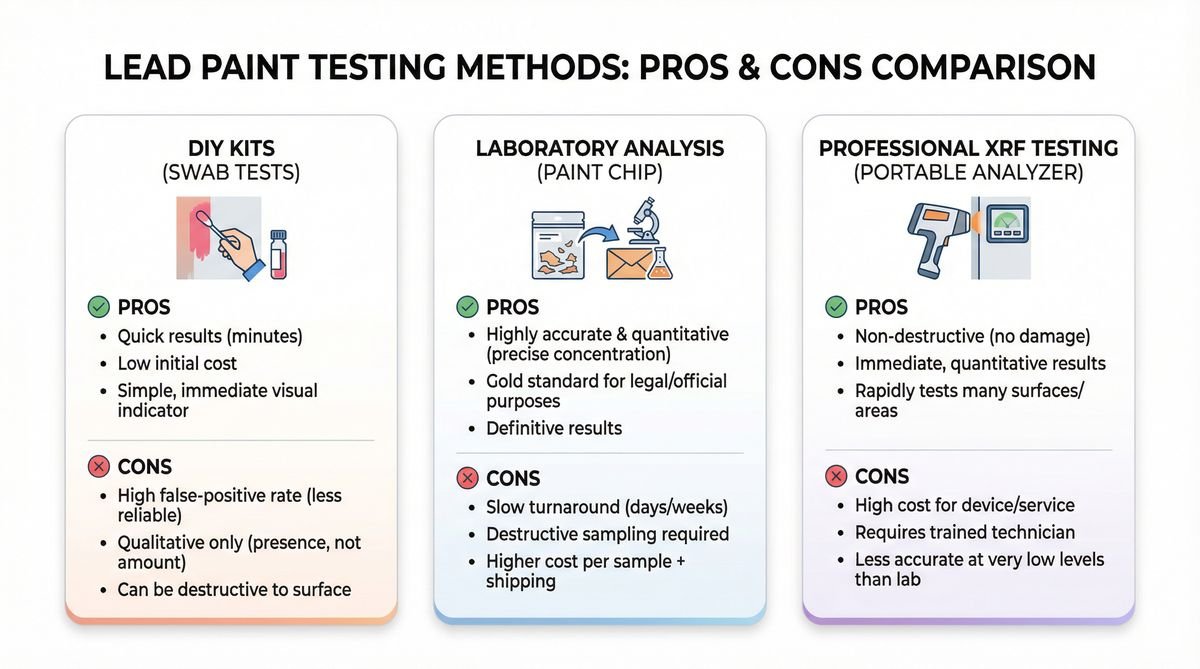
When faced with the possibility of lead paint, homeowners have a spectrum of testing options, each with its own advantages and limitations. The simplest and most accessible method involves home test kits. These kits are widely available at hardware stores and typically involve rubbing a treated swab on a paint surface. A color change, often to pink or red, indicates the presence of lead. These kits are affordable and provide immediate, qualitative (yes/no) results. However, it’s crucial to understand their limitations: they are not always as accurate as professional tests and are not recognized by the EPA for all regulatory purposes [1].
For homeowners opting for a DIY kit, proper usage is paramount to ensure the most reliable results possible. First, select an EPA-recognized kit to ensure a higher degree of accuracy. When testing, carefully follow the manufacturer’s instructions. It’s often recommended to cut a small notch through all paint layers to test the older, underlying coats, as lead was more prevalent in earlier formulations. After applying the swab, observe the color change carefully, noting that some kits may show a faint positive. Always wear gloves and eye protection, and ensure proper ventilation during this process. Dispose of used swabs and any paint chips safely, ideally in a sealed plastic bag [3].
A more definitive approach is laboratory analysis. This involves collecting paint chip, dust, or soil samples from your home and sending them to an accredited laboratory for testing. The process typically yields highly accurate, quantitative results, providing the exact concentration of lead present. While this method offers superior reliability, it comes with a higher cost and a longer turnaround time, usually several business days [3]. When collecting samples, ensure you follow the lab’s specific instructions for sample size and packaging to avoid contamination and ensure accurate analysis. A list of National Lead Laboratory Accreditation Program (NLLAP) laboratories can be found on the EPA website [1].
The most comprehensive and accurate testing method is a professional inspection using XRF (X-ray fluorescence) testing. A certified lead inspector or risk assessor uses a specialized handheld device to non-destructively measure lead concentrations in paint layers. This method provides immediate, precise results without damaging the painted surface. Professional inspections offer a complete assessment of lead hazards throughout the home, including areas that might be difficult to access with DIY kits. While this is the most expensive option, it provides the highest level of certainty and is often required for real estate transactions or renovation projects. The cost for professional services can vary, but typically ranges from a few hundred to over a thousand dollars, depending on the size of the home and the extent of testing required [3].
Deciphering the Results: What Your Lead Test Means
Answer Capsule: Interpreting lead test results involves understanding hazard levels and the condition of the paint. A positive test doesn’t always mean immediate danger, but it necessitates careful management. Knowing when lead levels are considered hazardous and what actions to take is crucial for effective lead hazard control.
Receiving a positive lead test result can be concerning, but it’s important to understand what the results truly signify. Lead levels are typically measured in parts per million (ppm) or milligrams per square centimeter (mg/cm²). Regulatory bodies like the California Department of Public Health (CDPH) and the EPA define specific thresholds for what constitutes a lead hazard. For instance, paint with lead concentrations of 5,000 ppm or more, or 1.0 mg/cm² or more via XRF, is generally considered hazardous [3]. Understanding these benchmarks is critical for assessing the severity of the situation.
Crucially, the condition of the lead paint plays a significant role in determining the immediate risk. Intact, undisturbed lead paint that is in good condition generally poses a lower risk than paint that is chipping, peeling, or chalking. Deteriorating paint can release lead dust and chips, which are the primary sources of exposure. Therefore, even if lead paint is present, if it’s in excellent condition and not in a high-friction area, immediate, drastic action may not be necessary. However, any signs of degradation warrant prompt attention [4].
Based on the test results and the paint’s condition, homeowners can determine the appropriate course of action. If lead levels are low and the paint is intact, regular monitoring and maintenance might suffice. If lead levels are high or the paint is deteriorating, interim controls or full abatement may be necessary. It’s vital to consult with certified professionals to understand the implications of your specific test results and to develop a tailored plan for lead hazard control [3].
Taking Action: Lead-Safe Practices and Remediation
Answer Capsule: If lead paint is present, implementing lead-safe practices and considering remediation are essential to protect occupants. This includes regular cleaning, interim controls like encapsulation, or professional abatement for more severe cases. Always prioritize safety and, for significant work, engage lead-safe certified professionals.
Once lead paint is identified, proactive measures are essential to mitigate risks and ensure a safe living environment. The approach to managing lead paint depends largely on its condition and location. For intact lead paint, interim controls are often the first line of defense. This can include encapsulation, where a special coating is applied over the lead paint to create a barrier, or enclosure, which involves covering the lead-painted surface with a new material like drywall or paneling. Repairing damaged painted surfaces promptly and carefully is also a key interim control [4]. These methods aim to contain the lead paint and prevent the release of hazardous dust and chips.
For more severe cases, or when undertaking significant renovations, lead abatement may be necessary. Abatement involves the permanent removal of lead-based paint hazards. This can include removing lead-painted components, replacing windows or doors, or completely stripping paint from surfaces. Due to the inherent risks of disturbing lead paint, abatement must be performed by lead-safe certified professionals. These contractors are trained in specialized techniques to safely remove lead paint, minimize dust generation, and ensure proper disposal of lead-contaminated waste [4]. Attempting extensive lead removal without proper training and equipment can inadvertently increase exposure risks for occupants and workers.
Beyond specific remediation efforts, adopting lead-safe cleaning practices is crucial for ongoing protection. This is a key differentiation module, offering practical, actionable advice for homeowners. Regular wet cleaning of floors, window sills, and other surfaces helps to remove lead dust before it can accumulate. Use a damp cloth or mop with an all-purpose cleaner; avoid dry sweeping or vacuuming with non-HEPA filters, as these can stir up lead dust. For carpets and rugs, wet scrubbing or steam cleaning is preferable to dry methods. Always dispose of cleaning materials, such as wipes and mop heads, in sealed bags to prevent lead contamination. These routine practices, though simple, significantly reduce the risk of lead exposure in homes with lead paint [4].
Frequently Asked Questions About Lead Paint Testing
Answer Capsule: This section addresses common inquiries regarding lead paint testing, covering topics from initial identification to professional involvement and associated costs. These answers provide quick, reliable information to help homeowners navigate the complexities of lead paint concerns.
How can I tell if my home has lead paint?
The most reliable way to determine if your home has lead paint is through testing. While visual cues like chipping or peeling paint in homes built before 1978 can be indicators, only a test can confirm its presence. You can use a home test kit for a preliminary check or, for definitive results, hire a certified professional for XRF testing or send samples to an accredited laboratory [1, 3].
What are the dangers of lead paint?
Lead paint poses serious health risks, particularly to young children and pregnant women. Exposure can lead to developmental delays, learning disabilities, behavioral problems, and damage to the brain, kidneys, and nervous system. In adults, it can cause high blood pressure, joint and muscle pain, and reproductive issues [2, 5].
When should I hire a professional to test for lead paint?
You should consider hiring a professional to test for lead paint if your home was built before 1978, especially if you have young children, pregnant individuals, or plan to undertake renovations. Professionals offer accurate, comprehensive assessments and can advise on the safest course of action [3, 4].
How much does it cost to test for lead paint?
The cost of lead paint testing varies depending on the method. Home test kits are the most affordable, typically costing under $30. Laboratory analysis of samples can range from $25 to $50 per sample. Professional XRF testing and risk assessments are more expensive, usually ranging from a few hundred to over a thousand dollars, depending on the scope of work [3].
Can I remove lead paint myself?
While it is technically possible to remove lead paint yourself, it is strongly discouraged due to the significant health risks involved. Improper removal can release large amounts of lead dust, contaminating your home and exposing occupants. For any lead paint removal, especially large areas, it is highly recommended to hire lead-safe certified professionals who have the training and equipment to do so safely [4].
Conclusion
Answer Capsule: Testing for lead paint in older homes is a critical safety measure, achievable through DIY test kits for initial screening or professional XRF and lab analysis for definitive results. When lead is confirmed, certified abatement professionals should handle removal, while encapsulation offers a lower-cost containment alternative for stable painted surfaces.
Testing for lead paint in an old house is a critical step in ensuring a safe and healthy living environment. By understanding the risks, knowing where to look, utilizing appropriate testing methods, and taking informed action, homeowners can effectively manage lead hazards. Prioritizing safety and, when necessary, consulting with certified professionals will safeguard your home and loved ones from the silent threat of lead paint.
References
Answer Capsule: The following authoritative sources from the EPA, CDC, and housing safety organizations provide the regulatory standards, health data, and testing guidance referenced throughout this article on lead paint identification and remediation.
- [1] U.S. Environmental Protection Agency. (n.d.). How can I tell if my home contains lead-based paint? Retrieved from https://www.epa.gov/lead/how-can-i-tell-if-my-home-contains-lead-based-paint
- [2] Minnesota Department of Health. (2024, October 15). Lead Paint Testing. Retrieved from https://www.health.state.mn.us/communities/environment/lead/home/testlead.html
- [3] California Department of Public Health. (2023, February 25). Testing Your Home for Lead. Retrieved from https://www.cdph.ca.gov/Programs/CCDPHP/DEODC/CLPPB/Pages/home_test.aspx
- [4] U.S. Environmental Protection Agency. (n.d.). How to Make Your Home Lead-Safe. Retrieved from https://www.epa.gov/lead/how-make-your-home-lead-safe
- [5] Alpha Environmental. (2024, July 10). Lead Testing in Older Homes: Identifying Lead-Based Paint Hazards. Retrieved from https://alphaenvironmental.net/blog/lead-testing-in-older-homes-identifying-lead-based-paint-hazards/
- [6] Smith and Company Painting. (n.d.). How to Test for Lead Paint in an Old Home. Retrieved from https://smithandcompanypainting.com/test-for-lead-paint-in-an-old-home/
Most Viewed