Home repairs are an inevitable aspect of property ownership, and mastering basic DIY skills can significantly reduce maintenance costs and enhance a home’s longevity. Addressing minor issues promptly prevents them from escalating into major, expensive problems, empowering homeowners with practical knowledge and self-sufficiency.
Essential Tools for DIY Home Repairs: Building Your Homeowner’s Toolkit
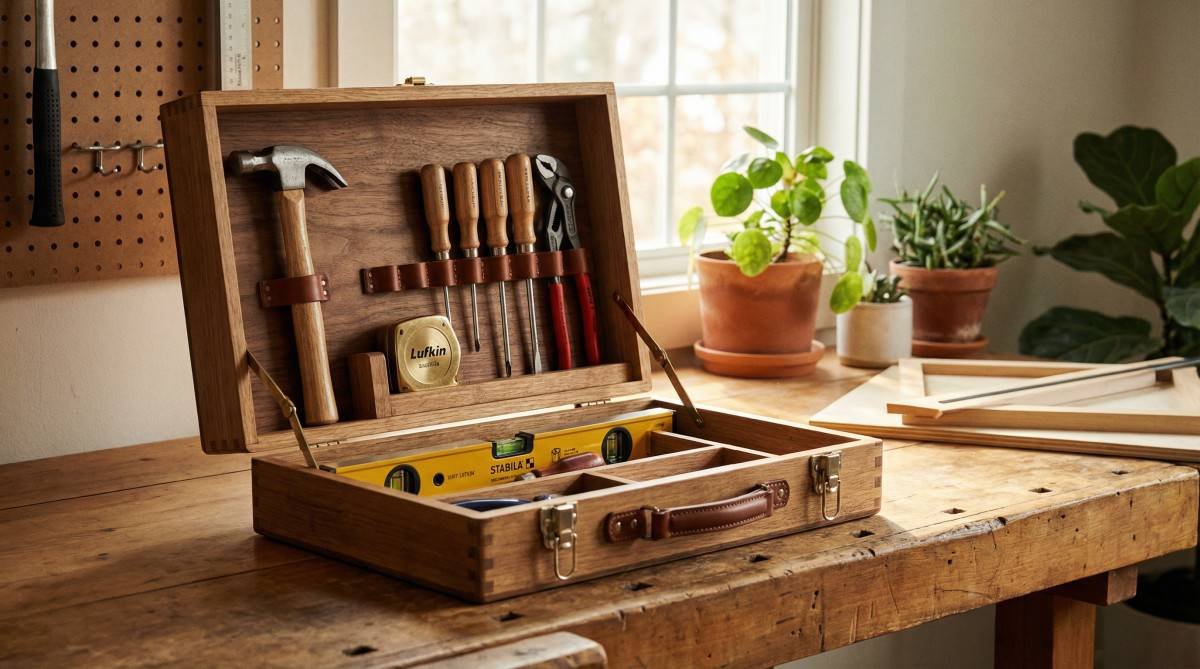
For homeowners in any region, a well-equipped toolkit is fundamental for tackling DIY home repairs efficiently and safely, ensuring that minor issues can be addressed promptly without incurring professional costs. Having the right tools on hand not only simplifies tasks like tightening loose screws or unclogging drains but also instills confidence in managing household maintenance.
To effectively manage common household repairs, a foundational toolkit is indispensable. This collection of basic hand tools and safety gear forms the backbone of any DIY endeavor, enabling homeowners to address a wide array of issues from minor adjustments to more involved fixes. Investing in quality tools ensures durability and reliability, making repair tasks smoother and more successful.
| Tool | Primary Use | Why It’s Essential |
|---|---|---|
| Screwdriver Set (Phillips & Flathead) | Tightening/loosening screws on fixtures, appliances, and furniture. | Versatile for countless small repairs and assemblies. |
| Claw Hammer | Driving and removing nails; light demolition. | Fundamental for carpentry and general fastening tasks. |
| Adjustable Wrench | Tightening/loosening nuts and bolts of various sizes. | Adaptable for plumbing and mechanical adjustments. |
| Pliers (Needle-nose & Slip-joint) | Gripping, bending, cutting wires, and holding small objects. | Useful for electrical work, plumbing, and general manipulation. |
| Tape Measure (25 ft) | Accurate measurement for projects, installations, and repairs. | Crucial for precision in all home improvement tasks. |
| Utility Knife | Cutting various materials like drywall, caulk, and carpet. | Sharp and precise for clean cuts in many applications. |
| Safety Glasses & Gloves | Protecting eyes from debris and hands from injury. | Non-negotiable for personal safety during any repair. |
Beyond these basics, consider adding a cordless drill for faster and easier driving of screws and drilling holes, a level for ensuring straight installations, and a voltage tester for safely checking electrical circuits. These additions can significantly expand a homeowner’s repair capabilities, making more complex tasks manageable.
Common Plumbing Repairs: Addressing Leaks and Clogs to Prevent Water Damage
For homeowners, understanding basic plumbing repairs is crucial for maintaining property integrity and preventing costly water damage, as issues like leaky faucets or clogged drains can quickly escalate if not addressed promptly. Proactive maintenance and timely fixes ensure the efficient operation of water systems and contribute to a healthier living environment.
Plumbing issues are among the most frequent home repair challenges, ranging from minor annoyances to significant emergencies. Learning to identify and fix common problems can save money on professional services and prevent extensive damage to your home’s structure and belongings. The key is often a combination of proper tools and a systematic approach to troubleshooting.
Fixing Leaky Faucets and Pipes
A dripping faucet can waste gallons of water annually and lead to increased utility bills. Often, the culprit is a worn-out washer or O-ring. To fix this, first, turn off the water supply to the faucet, usually via the shut-off valves located under the sink. Then, disassemble the faucet handle and spout to access the internal components. Replace any visibly damaged rubber washers or O-rings with new ones of the correct size. Reassemble the faucet, turn the water back on, and check for leaks. For leaky pipes, temporary fixes like repair clamps can hold until a permanent solution, such as replacing a section of pipe, can be implemented.
Unclogging Drains Effectively
Clogged drains are a common household nuisance, typically caused by an accumulation of hair, soap scum, grease, and other debris. For minor clogs, a plunger can often create enough pressure to dislodge the blockage. Ensure the plunger forms a tight seal over the drain opening and plunge vigorously. If plunging is ineffective, a drain snake (or auger) can be used to physically break up or retrieve the obstruction. Insert the snake into the drain and crank the handle to feed it through the pipe until it reaches the clog. Rotate and push the snake to clear the blockage, then flush the drain with hot water. Avoid chemical drain cleaners, as they can damage pipes and are harmful to the environment.
Regular maintenance, such as using drain screens to catch hair and food particles, and periodically flushing drains with hot water and baking soda, can help prevent clogs from forming. Knowing these basic plumbing repair techniques empowers homeowners to handle most common issues without professional intervention.
Basic Electrical Repairs: Safely Addressing Common Wiring Issues and Outlets
For homeowners, understanding basic electrical repairs is paramount for ensuring safety and functionality, as correctly addressing issues like tripped breakers or faulty outlets prevents potential hazards and maintains a reliable power supply throughout the property. Prioritizing electrical safety and knowing when to call a professional are key aspects of responsible home maintenance.
Electrical problems can be intimidating, but many minor issues can be safely addressed by a homeowner with basic knowledge and caution. It is crucial to always prioritize safety by turning off power at the circuit breaker before attempting any electrical work. This section covers common electrical repairs that can be tackled by a DIY enthusiast.
Understanding and Resetting Circuit Breakers
Circuit breakers are safety devices designed to protect electrical circuits from damage caused by an overload or short circuit. When a breaker trips, it cuts off power to a specific area of your home. To reset a tripped breaker, first, identify the affected circuit in your electrical panel, which is typically located in the garage, basement, or utility room. Locate the breaker that is in the ‘off’ or middle position. Firmly push the breaker to the ‘off’ position first, then to the ‘on’ position. If the breaker immediately trips again, it indicates an underlying electrical problem that requires professional attention.
Replacing a Wall Outlet or Light Switch
Replacing a faulty wall outlet or light switch is a straightforward task that can improve both safety and aesthetics. Before starting, always turn off the power to the circuit at the main breaker panel and verify that the power is off using a voltage tester. Unscrew the old outlet or switch from the wall box and carefully disconnect the wires, noting their positions (typically black for hot, white for neutral, and bare copper or green for ground). Connect the new outlet or switch, ensuring wires are securely attached to the corresponding terminals. Re-install the device into the wall box, attach the faceplate, and restore power at the breaker. If unsure at any step, consult a qualified electrician.
While many minor electrical issues are manageable, complex wiring, new installations, or persistent problems should always be handled by a licensed electrician to ensure compliance with local codes and prevent serious hazards.
Drywall Repair Techniques: Patching Holes and Smoothing Surfaces for a Flawless Finish
For homeowners, mastering basic drywall repair techniques is essential for maintaining interior aesthetics and structural integrity, as promptly addressing holes, cracks, or dents ensures walls remain smooth and visually appealing throughout the property. Effective drywall repair contributes significantly to a home’s overall upkeep and value.
Drywall is a common interior wall material, and it’s susceptible to various forms of damage, from small nail holes to larger punctures. Fortunately, many drywall repairs are straightforward and can be completed by a homeowner with a few basic tools and materials. Addressing these imperfections not only improves the appearance of your home but also prevents further damage or deterioration.
Fixing Small Holes and Dents
Small holes, such as those left by picture hangers or minor impacts, can be easily repaired using spackle or lightweight joint compound. Begin by cleaning the area around the hole, removing any loose debris or frayed paper. Apply a small amount of spackle to a putty knife and press it firmly into the hole, ensuring it fills the void completely. Scrape off any excess spackle, leaving a smooth, flush surface. Allow the spackle to dry completely, then lightly sand the area until it is smooth and even with the surrounding wall. For dents, simply apply a thin layer of spackle over the indentation, smooth it, let it dry, and sand.
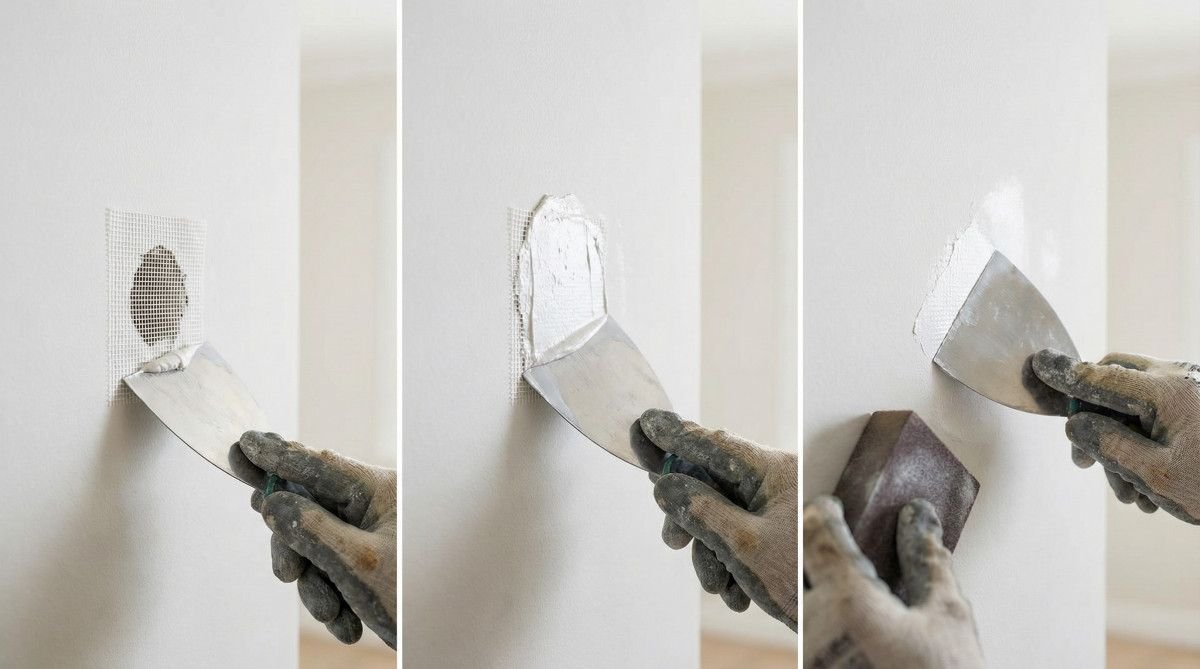
Patching Larger Holes in Drywall
Larger holes, such as those caused by doorknobs or significant impacts, require a more substantial repair using a drywall patch kit or a piece of new drywall. For a patch kit, follow the manufacturer’s instructions, which typically involve applying an adhesive-backed mesh patch over the hole, then covering it with several thin coats of joint compound. For a custom patch, cut a piece of new drywall slightly larger than the damaged area. Place the new piece over the hole and trace its outline. Cut out the damaged section of drywall along the traced lines. Insert the new drywall piece, securing it with drywall screws into existing studs or by adding furring strips behind the opening. Apply joint tape around the edges of the patch, then cover with multiple thin coats of joint compound, feathering the edges to blend with the wall. Sand smooth once dry.
Proper preparation, patience during drying times, and careful sanding are key to achieving an invisible repair. Once the repair is complete, the area can be primed and painted to match the rest of the wall, restoring its original appearance.
Basic Appliance Maintenance: Extending Lifespan and Ensuring Efficiency for Household Appliances
For homeowners, performing basic appliance maintenance is vital for extending the lifespan of essential household units and ensuring their optimal energy efficiency, thereby reducing utility costs and avoiding premature replacements. Regular upkeep of appliances like refrigerators, washing machines, and dishwashers contributes significantly to a well-functioning and economical home.
Household appliances are significant investments, and their proper functioning is integral to daily life. Regular, simple maintenance can prevent common breakdowns, improve performance, and extend the life of these machines. Understanding basic troubleshooting and care for your appliances can save you from unexpected repair bills and inconvenience.
Refrigerator Coil Cleaning
The condenser coils on your refrigerator are crucial for its cooling efficiency. When these coils become covered in dust and pet hair, the refrigerator has to work harder, consuming more energy and potentially leading to premature failure. To clean them, first, unplug the refrigerator for safety. Locate the coils, usually at the back or underneath the unit. Use a vacuum cleaner with a brush attachment to gently remove dust and debris. For stubborn grime, a coil brush can be used. This simple task, performed every 6-12 months, can significantly improve your refrigerator’s efficiency and longevity.
Washing Machine Care
Washing machines can develop odors and build-up from detergent residue and mildew. To prevent this, leave the door or lid ajar after each use to allow the drum to air dry. Periodically, run an empty cycle with hot water and a washing machine cleaner, or a mixture of white vinegar and baking soda, to sanitize the drum and remove residue. Also, check and clean the detergent dispenser regularly. For front-loading machines, pay attention to the rubber gasket around the door, wiping it dry and cleaning any mold or mildew that accumulates.
Dishwasher Filter Maintenance
Many modern dishwashers have a filter system that traps food particles to prevent them from recirculating and redepositing on dishes. If this filter becomes clogged, your dishes may not come out clean, and the dishwasher might develop an odor. Consult your appliance manual to locate and remove the filter, which is typically found at the bottom of the dishwasher tub. Rinse the filter under running water to remove food debris. For a thorough cleaning, use a soft brush and a mild detergent. Reinstall the filter securely. Regular cleaning, ideally once a month, ensures optimal cleaning performance.
By incorporating these basic maintenance tasks into your routine, you can keep your household appliances running smoothly, extend their operational life, and contribute to a more energy-efficient home.
Frequently Asked Questions About DIY Home Repairs
What are the most common DIY home repairs for beginners?
Beginners can typically handle tasks such as fixing leaky faucets, unclogging drains, patching small holes in drywall, replacing light bulbs, and performing basic appliance maintenance like cleaning refrigerator coils. These repairs require minimal specialized tools and offer a great starting point for developing home maintenance skills.
When should I call a professional for home repairs?
It is advisable to call a professional for complex electrical work (beyond replacing an outlet or switch), major plumbing issues (like burst pipes or sewer line problems), structural repairs, HVAC system overhauls, or any task that involves gas lines. If you are unsure about your ability to safely and effectively complete a repair, seeking professional help is always the safest option.
What safety precautions should I take during DIY repairs?
Always prioritize safety by wearing appropriate personal protective equipment (PPE) such as safety glasses, gloves, and sturdy footwear. Ensure power is turned off at the circuit breaker for electrical work and water supply is shut off for plumbing repairs. Use tools correctly and follow manufacturer instructions. Keep a first-aid kit accessible and know when to stop and call for professional assistance.
How can I learn more about specific DIY repair techniques?
Numerous resources are available for learning DIY repair techniques, including online tutorials, instructional videos, home improvement books, and workshops offered by local hardware stores or community centers. Starting with simple projects and gradually advancing to more complex ones can build confidence and expertise over time.
What are the benefits of performing DIY home repairs?
Performing DIY home repairs offers several benefits, including significant cost savings on labor, a deeper understanding of your home’s systems, increased self-sufficiency, and the satisfaction of maintaining your property. Timely DIY fixes can also prevent minor issues from escalating into more expensive problems, preserving your home’s value.
Conclusion
Mastering DIY home repairs is an invaluable skill for any homeowner, offering substantial benefits in terms of cost savings, property maintenance, and personal empowerment. By equipping yourself with essential tools and understanding fundamental repair techniques for plumbing, electrical systems, drywall, and appliances, you can confidently address many common household issues. This proactive approach not only keeps your home in optimal condition but also prevents minor problems from escalating into costly emergencies. While DIY efforts are highly beneficial, recognizing when to enlist professional help is equally important for safety and complex tasks. Embracing DIY home repairs fosters a deeper connection with your living space and ensures its long-term health and functionality.
Most Viewed