
The OpenClaw browser extension turns your browser into a remotely controllable automation node. It bridges your local or cloud-hosted OpenClaw instance directly to a live browsing session through Chrome DevTools Protocol (CDP) — the same low-level interface behind Puppeteer and Playwright. Without this extension installed, OpenClaw’s automation pipeline has no way to reach your browser.
A missed permission, a wrong port, or an incompatible browser can silently kill your entire setup. The error messages are rarely helpful. This walkthrough covers the full openclaw browser extension install process for Chrome, Brave, and Edge, explains every permission the extension requests, and includes a troubleshooting section for the failures that send most people to Reddit.
What Is the OpenClaw Browser Extension?
The OpenClaw browser extension is a lightweight connector that links your browser to OpenClaw’s node host proxy, giving the automation pipeline full control over browser sessions. It is not a standalone tool — it functions exclusively as a bridge between the node host process and your browser tabs.
How the Extension Works Under the Hood
When active, the extension opens a communication channel using Chrome DevTools Protocol. The node host sends CDP commands through this channel to read page content, simulate clicks, fill forms, and intercept network requests. Think of it as a two-way radio: the extension is the antenna, and the node host is the operator.
A standard browser extension operates independently inside Chrome’s sandbox. The OpenClaw extension does the opposite — it has no useful function on its own. Install it without a running node host and you’ll see nothing but a gray icon. The two components are designed to work as a pair.
Who Needs It
| Audience | Primary Use Case | Setup Expectation |
|---|---|---|
| Developers | Building automation scripts via the OpenClaw MCP pipeline | Full CDP access; node host must be configured and running first |
| Non-technical users | Running pre-built workflows (data collection, form automation) | One-time setup; minimal configuration after connection |
| IT admins | Team-wide deployment across managed machines | Must account for Chrome policy restrictions and network-level access |
For non-technical users, the key milestone is the green “connected” indicator in the extension popup. That status means the full pipeline is live. Everything before that is just plumbing.
Step-by-Step: Install the OpenClaw Extension in Chrome
The Chrome Web Store install takes under three minutes and requires no coding knowledge. You’ll add the extension, confirm permissions, and connect it to your running node host. Every click is covered below, including what to do when something breaks.
Prerequisites
| Requirement | Minimum | Notes |
|---|---|---|
| Google Chrome | Version 80+ | Check via chrome://settings/help |
| Operating System | Windows 10, macOS 11, or Ubuntu 20.04+ | Apple Silicon runs without issues |
| Node Host | Local daemon running, or remote workspace active | Default port: localhost:9222 |
| Internet | Required for Web Store install only | Post-install operation runs fully local |
On Linux, make sure Chrome is the official Google release — not a distro-packaged Chromium build. Some Chromium packages strip the CDP layer that OpenClaw depends on. Check with google-chrome --version to confirm.
Installing from the Chrome Web Store
- Open Chrome and navigate to the Chrome Web Store. Search for “OpenClaw” or use the direct link from your OpenClaw dashboard — make sure you land on the verified listing.
- Click Add to Chrome in the upper-right corner of the listing page.
- A permissions dialog appears. Chrome shows the specific data access the extension needs. (Each permission is explained in the Permissions section below.)
- Click Add extension to confirm. Chrome downloads and installs the extension automatically — usually under five seconds.
- Look for the OpenClaw icon in your toolbar. If it doesn’t appear, click the puzzle-piece Extensions icon next to the address bar and pin OpenClaw.
Corporate-managed Chrome profiles sometimes block Web Store installs via group policy. If “Add to Chrome” is grayed out, your browser is managed — talk to your IT administrator or look into Chrome’s enterprise extension deployment options.
Connecting the Extension to Your Node Host
With the extension installed, click the OpenClaw icon in your toolbar to open the popup. You’ll see a connection field — enter your node host address. For most local setups, this is localhost:9222. If you’re running OpenClaw on a VPS or remote server, enter that machine’s IP address and port instead.
Click Connect. Two things can happen:
- Green “Connected” indicator — the handshake worked. Your browser is now controllable by OpenClaw. Run a test automation to verify end-to-end.
- Red “Disconnected” or timeout — the node host is either not running, listening on a different port, or blocked by a firewall. Jump to the Troubleshooting section below.
For remote setups (e.g., VPS-hosted OpenClaw connecting back to your local browser), you’ll need a network tunnel. Tailscale is the most common solution: install it on both machines, and the node host can reach your browser’s extension over the Tailscale mesh network without exposing any public ports.
Browser Compatibility: Chrome, Brave, Edge, and Beyond
Chrome is the only browser with full, unconditional support. Brave and Edge work but require specific configuration. Firefox and Arc are incompatible due to protocol-level limitations, not policy decisions.
| Browser | Support | Key Limitation | Workaround |
|---|---|---|---|
| Chrome | Full | None (v80+ required) | N/A |
| Brave | Conditional | Shields blocks CDP on localhost | Disable Shields for localhost |
| Microsoft Edge | Partial | Enterprise policies may block sideloading | Edge extension management settings |
| Firefox | None | No CDP support | Use OpenClaw managed remote browser |
| Arc | None | Container model conflicts with node host | Use OpenClaw managed remote browser |
Chrome
Any Chrome release from the past two years meets the v80+ requirement. The extension uses Manifest V3, which Google enforced for all new Web Store submissions in 2024. No special flags or workarounds needed on a standard install.
Brave
Brave’s Shields feature intercepts network traffic in ways that break CDP communication between the extension and node host. Fix: click the Shields lion icon in the address bar while on localhost, toggle Shields to Off for that origin. The connection stabilizes immediately.
If problems persist after disabling Shields, Brave’s fingerprinting protection may be interfering separately. Go to brave://settings/privacy and set fingerprinting blocking to “Standard” instead of “Strict” for local development.
Microsoft Edge
Edge’s Chromium foundation means the extension installs directly from the Chrome Web Store. The catch is enterprise environments: IT-enforced policies under ExtensionInstallBlocklist or ExtensionSettings can silently prevent installation. Personal Edge installations won’t encounter this. If you’re on a managed Edge profile, check edge://policy to see what restrictions apply.
Firefox and Arc
Firefox uses its own extension API and has no Chrome DevTools Protocol support — the fundamental mechanism OpenClaw relies on. Arc’s tab container model conflicts with how the node host proxy expects to control browser tabs. Neither browser has a realistic path to compatibility in the near term.
The workaround for both: use OpenClaw’s managed remote browser feature. OpenClaw spins up a cloud-hosted Chromium instance that the node host controls directly, bypassing the local browser entirely. You lose the convenience of using your own signed-in browser session, but the automation pipeline works without restriction.
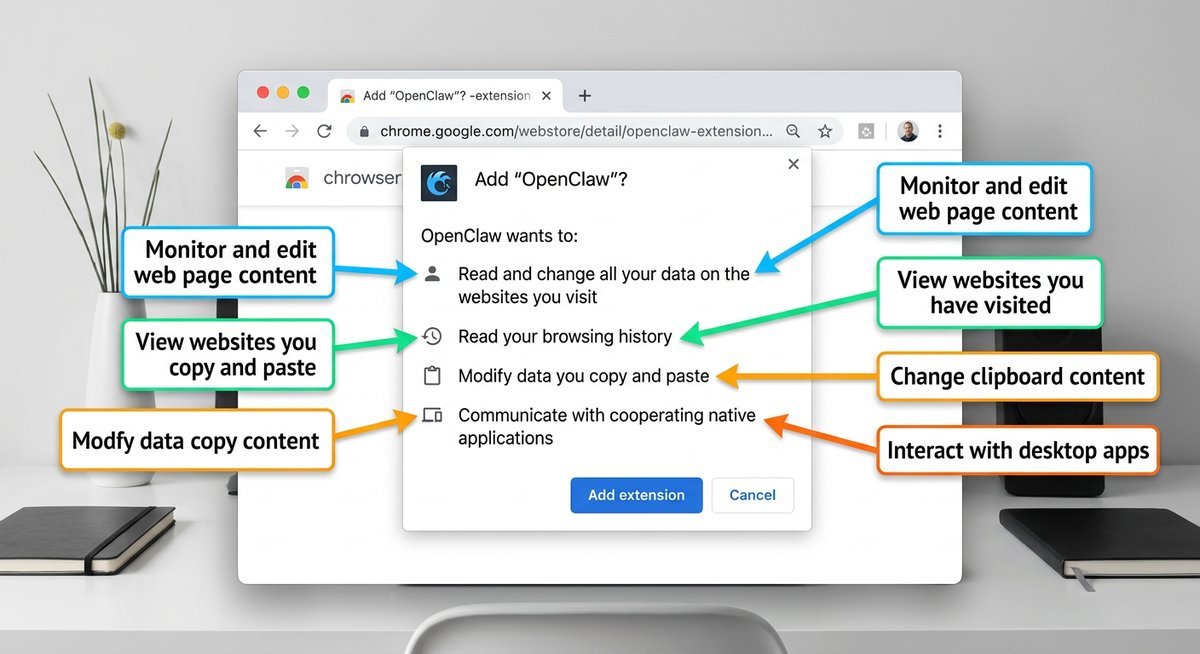
Permissions Explained — Is the OpenClaw Extension Safe?
The extension requests a small, specific set of permissions. None are unusual for a CDP-based tool, and none involve transmitting browsing data to third-party servers. Here is exactly what Chrome shows during install and what each permission means.
Permission Breakdown
| Chrome Permission Dialog | What It Actually Does | Why OpenClaw Needs It |
|---|---|---|
| Read and change all data on websites you visit | Lets the extension interact with page content — DOM reading, clicking, typing, scrolling | Core automation requirement; without this, the extension cannot execute any browser actions |
| Communicate with native applications | Opens a bridge to the locally running OpenClaw node host process via native messaging | Relays CDP commands from node host to browser — this is the entire control mechanism |
| Manage your apps, extensions, and themes | Reads the extension’s own installation state | Version checking and self-diagnostics only; cannot install or remove other extensions |
“Read and change all data” sounds alarming. Every automation extension requests it. In practice, OpenClaw uses this permission only during active automation sessions and only on tabs you’ve explicitly targeted. No passive background data collection occurs.
The native messaging permission deserves a closer look. It does not open an internet connection. Communication happens exclusively with the local node host over a sandboxed OS-level pipe. Traffic never leaves your machine unless your automation workflow explicitly navigates to an external URL.
One trust signal worth noting: OpenClaw does not request the cookies or history permissions. Those are the first indicators of a data-harvesting extension. Their absence is deliberate and meaningful.
Troubleshooting Common Install Failures
Most openclaw browser extension install problems fall into five categories. Each has a specific fix.
“Bundled Chrome Extension Is Missing” Error
This error appears when the CLI command openclaw browser cannot locate the extension files. The most common cause: a corrupted or incomplete OpenClaw installation. Reinstall OpenClaw from scratch using the official installer. On macOS and Linux, running openclaw update sometimes resolves it without a full reinstall.
Gray Icon, No Connection
The extension installed but the icon stays gray and nothing connects. This means the node host is not running or not reachable. Verify your node host is active:
- Local setup: run
openclaw browser --statusin your terminal. If it reports no active session, start one withopenclaw browser launch. - Remote setup: confirm the VPS is running and the port (default 9222) is accessible from your machine. A quick test:
curl http://your-server-ip:9222/json/versionshould return a JSON response.
Connection Drops Repeatedly
Intermittent disconnects usually point to a firewall or VPN interfering with the CDP WebSocket connection. Antivirus software with web protection features (Kaspersky, Norton, Bitdefender) can also intercept WebSocket traffic silently. Temporarily disable web protection and test again. If the connection stabilizes, add an exception for localhost:9222.
“Add to Chrome” Button Grayed Out
Your Chrome profile is managed by an organization. Navigate to chrome://policy to check active policies. Look for ExtensionInstallBlocklist or ExtensionInstallAllowlist entries. Contact your IT admin to whitelist the OpenClaw extension ID, or use an unmanaged Chrome profile for development.
Brave: Extension Installs but CDP Fails Silently
Brave’s Shields and fingerprinting protections block CDP traffic without any visible error. Disable Shields for localhost (click the lion icon in the address bar), then set fingerprinting protection to Standard at brave://settings/privacy. Restart Brave after both changes.
Frequently Asked Questions
How do I install the OpenClaw browser extension in Chrome?
Open the Chrome Web Store, search for “OpenClaw,” click Add to Chrome, confirm the permissions dialog, and then connect the extension to your running node host using the extension popup. The entire process takes under three minutes. You need Chrome version 80 or higher and either a local OpenClaw node host or a remote workspace.
Is the OpenClaw browser extension safe to use?
Yes. The extension requests only the permissions necessary for browser automation via Chrome DevTools Protocol. It does not request access to your cookies or browsing history. Communication with the node host happens over a local OS-level pipe, not the internet. No data is collected or transmitted to third-party servers during normal operation.
Does the OpenClaw extension work with Brave or Firefox?
Brave works after disabling Shields for localhost and setting fingerprinting protection to Standard. Firefox is not supported because it lacks Chrome DevTools Protocol compatibility — the fundamental mechanism the extension relies on. Firefox users can use OpenClaw’s managed remote browser feature as an alternative.
What does “Bundled Chrome extension is missing” mean?
This error means the OpenClaw CLI cannot find the extension files on your system. It typically results from a corrupted installation. Reinstall OpenClaw using the official installer, or run openclaw update on macOS/Linux to repair the installation without starting from scratch.
Can I use the OpenClaw extension on a VPS or remote server?
Yes, but you need a network tunnel between your local browser and the remote server. Tailscale is the most common approach: install it on both machines, and the node host can reach your browser’s extension over the mesh network without exposing public ports. Enter the Tailscale IP and port in the extension popup instead of localhost.
How do I update the OpenClaw browser extension?
Chrome auto-updates extensions from the Web Store by default. To force an immediate update, navigate to chrome://extensions, enable Developer mode, and click Update in the top bar. The extension will pull the latest version within seconds.
Most Viewed