
The final walk-through is the last opportunity to verify that the home is in the agreed-upon condition before signing the closing documents and taking legal ownership. It is not a second home inspection — the inspection happened weeks earlier, notes a trusted property management Williamsburg VA company. The walk-through is a focused verification that agreed repairs were completed, the seller’s belongings are removed, and nothing has changed or been damaged since the inspection.
This guide covers exactly what to look for during a final walk-through before closing, organized by room and system, along with the specific issues that most commonly derail closings when discovered at this stage.
1. Purpose and Timing of the Final Walk-Through
Answer Capsule: The final walk-through should occur within 24 hours of closing — ideally the morning of closing day. This timing ensures the seller has vacated and any last-minute issues can be addressed before signing. Conducting the walk-through too early (days before closing) allows time for new damage to occur between the walk-through and closing day.
The walk-through serves three specific purposes: verifying that all agreed repairs from the inspection negotiation were completed, confirming that the property is in the same condition as when the offer was accepted (no new damage), and ensuring that all items included in the sale — appliances, fixtures, window treatments — are present and functioning.
Bring three documents to the walk-through: the original inspection report, the repair addendum listing agreed repairs, and the purchase contract specifying which items are included in the sale. These documents are the reference points for every verification made during the walk-through.
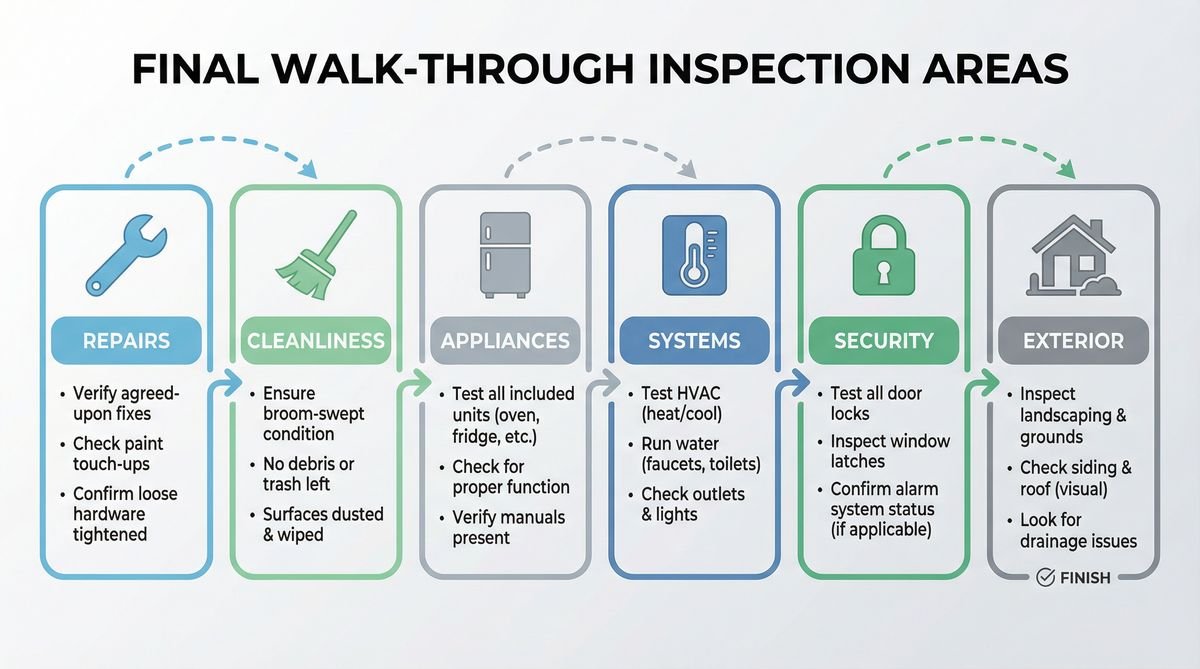
2. Systems to Test: The Non-Negotiable Checks
Answer Capsule: Every major system must be tested during the final walk-through: run all faucets and check for leaks, flush all toilets, test every light switch, run the HVAC system in both heating and cooling modes, test all appliances included in the sale, and check that all windows and doors open, close, and lock properly. These tests take 20–30 minutes and catch the most common last-minute issues.
Running water at every fixture for 30–60 seconds reveals slow drains, low water pressure, and discoloration that may indicate pipe issues. Flushing every toilet confirms proper operation and checks for running or slow-filling tanks. Testing the HVAC in both modes — even in mild weather — confirms that both the heating and cooling functions are operational before ownership transfers.
| System/Area | What to Check | Red Flag |
|---|---|---|
| Plumbing | Run all faucets, flush all toilets, check under sinks | Leaks, slow drains, discolored water |
| HVAC | Run heat and AC, check all vents, replace filter if needed | No airflow, unusual noises, failure to reach set temp |
| Electrical | Test every switch and outlet, check panel for tripped breakers | Dead outlets, flickering lights, warm switch plates |
| Appliances | Run dishwasher cycle, test oven/range, check refrigerator temp | Non-functional appliances included in sale |
| Windows/Doors | Open, close, and lock every window and exterior door | Broken seals (foggy glass), sticking, broken locks |
| Walls/Floors/Ceilings | Look for new stains, cracks, or damage since inspection | New water stains, holes, damage from moving |
| Garage | Test garage door opener, check for oil stains or damage | Opener not working, new stains |
| Exterior | Check roof (visible from ground), gutters, foundation | New damage, missing gutters, standing water |
3. Verifying Agreed Repairs Were Completed
Answer Capsule: For each repair listed in the inspection addendum, verify completion with documentation — not just visual inspection. Request receipts or invoices from licensed contractors for structural, electrical, plumbing, and HVAC repairs. A seller’s verbal assurance that a repair was made is not sufficient; professional repairs should have documentation that can be reviewed before closing.
Common repair verification issues include: repairs made with unpermitted work (particularly for electrical and plumbing), cosmetic fixes that mask but do not resolve underlying problems, and repairs completed by the seller personally rather than by licensed contractors as required by the addendum.
If a repair cannot be verified at the walk-through, options include: requesting a closing credit equal to the estimated repair cost, delaying closing until the repair is completed and verified, or proceeding with closing and accepting the risk. The first option — a closing credit — is the most common resolution for minor outstanding repairs.
4. What to Do If Problems Are Found
Answer Capsule: If significant issues are discovered during the final walk-through, do not sign the closing documents until the issues are resolved. Options include: requesting a closing credit, placing funds in escrow until repairs are completed, delaying closing, or in extreme cases, exercising the right to cancel the contract. Contact the real estate agent immediately — most issues are resolvable with negotiation.
Minor cosmetic damage from moving — small scuffs on walls, a broken light bulb — typically does not warrant delaying closing. Significant damage — a broken window, a new water stain on the ceiling, a non-functional HVAC system — warrants negotiation before signing. The buyer’s agent is the primary advocate in this negotiation.
Frequently Asked Questions
Can the final walk-through be skipped?
Technically yes, but it is strongly inadvisable. The final walk-through is the only opportunity to verify the property’s condition before ownership transfers. Issues discovered after closing are the new owner’s responsibility. Even in competitive markets where buyers feel pressure to waive contingencies, the final walk-through is a right that should always be exercised.
How long does a final walk-through take?
A thorough final walk-through of a typical single-family home takes 30–60 minutes. Larger homes or properties with known issues from the inspection may take longer. Rushing the walk-through to save time is a false economy — the consequences of missing a significant issue after closing are far more costly than the time invested.
Who should attend the final walk-through?
The buyer and the buyer’s real estate agent should always attend. The seller is typically not present, though their agent may be. A home inspector can be brought back for a re-inspection of specific repairs at additional cost — this is worth considering for major structural, electrical, or plumbing repairs that were agreed upon during negotiation.
Conclusion
The final walk-through is a brief but critical step in the home-buying process. Approaching it with a printed checklist, the original inspection report, and the repair addendum transforms it from a casual stroll through an empty house into a systematic verification that protects the buyer’s investment.
The goal is simple: confirm that the home is in the condition agreed upon, that all included items are present and functional, and that no new damage has occurred since the inspection. When everything checks out, closing day proceeds smoothly. When it does not, the walk-through provides the leverage needed to resolve issues before the transaction is final.
References
- National Association of Realtors (NAR). “Final Walk-Through Guide for Home Buyers.” 2025.
- Consumer Financial Protection Bureau (CFPB). “Your Home Loan Toolkit.” 2025.
- American Society of Home Inspectors (ASHI). “Re-Inspection Guidelines.” 2024.
Most Viewed