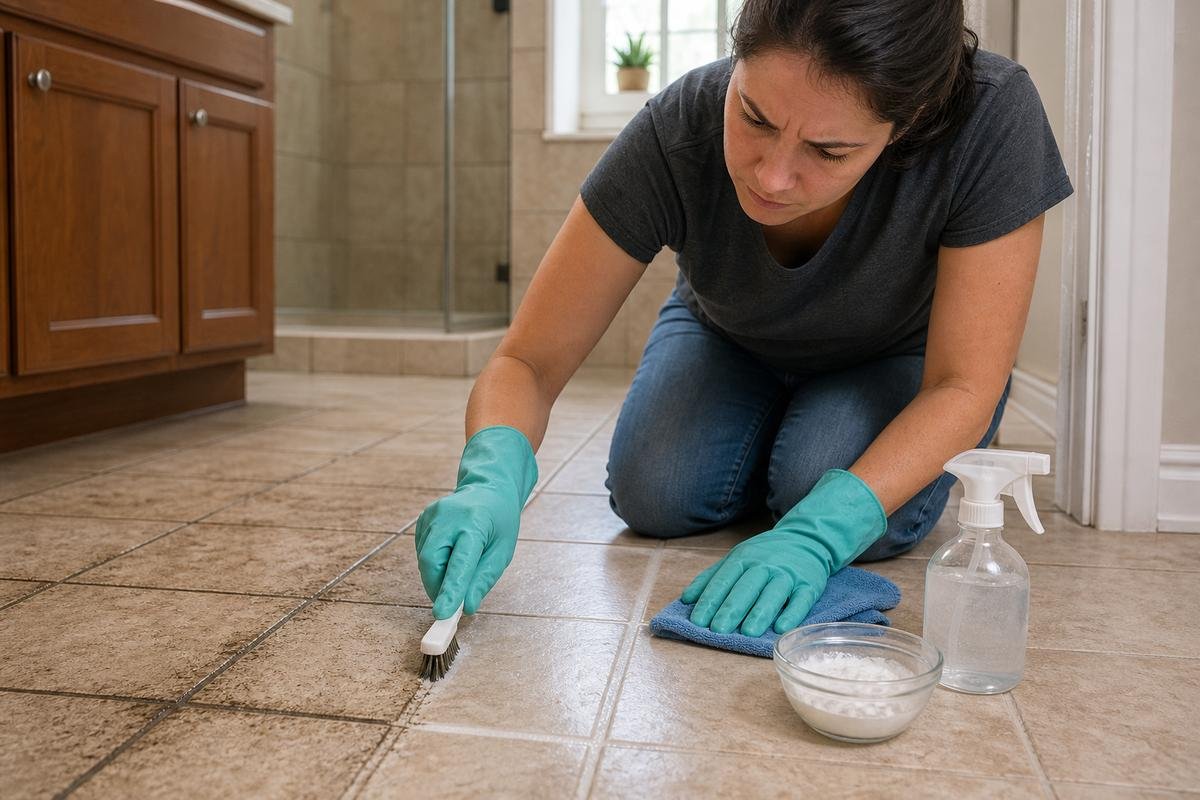
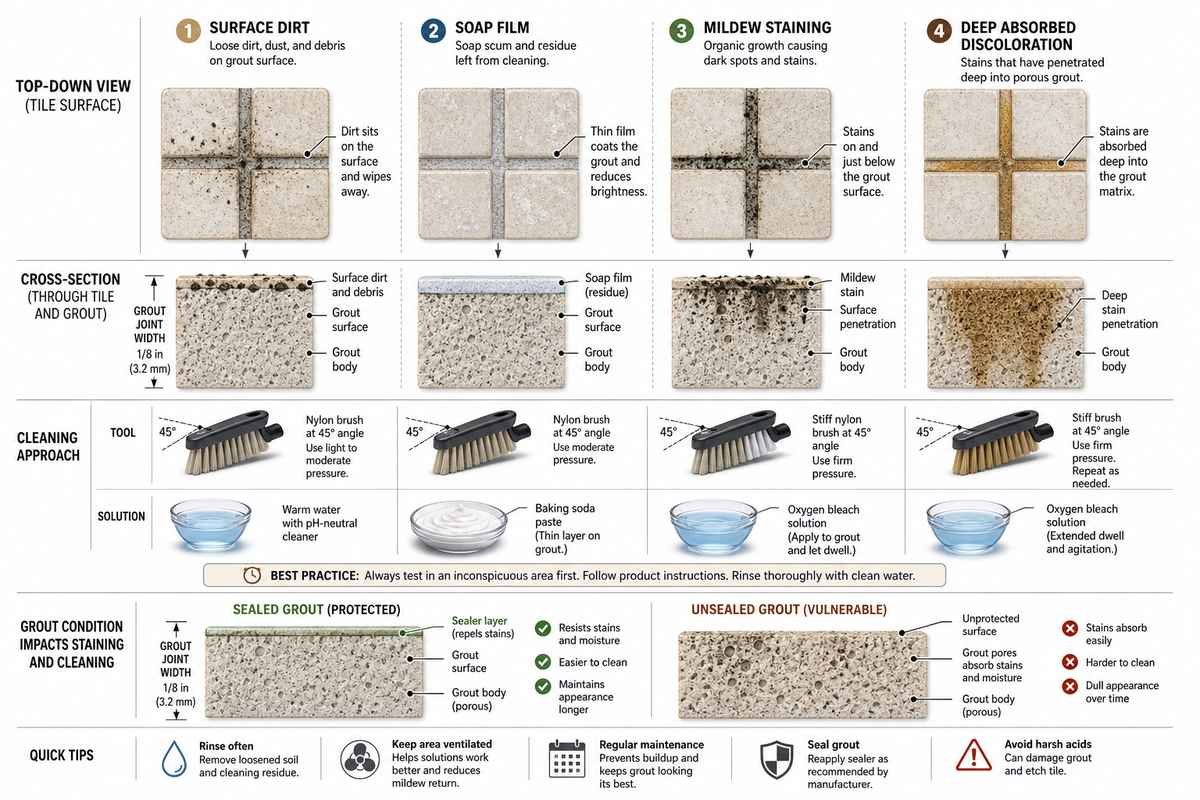
Grout cleaning tips for tile floors work best when the method matches the mess. Surface soil, soap film, mildew staining, and deep-set discoloration do not respond the same way, so the safest route is to identify the buildup first, then clean with the mildest effective option before sealing the grout again, explains TE Johnson & Sons specialists.
The advice that circulates most often is not exactly wrong, but it is usually incomplete. A baking soda paste can help. Oxygen bleach can help more on dingy cement grout. Steam can work on light buildup. The trouble starts when the same aggressive cleaner gets used on every floor, every stain, and every tile type.
Start by diagnosing the grout, not just scrubbing it
The fastest grout cleaning tips for tile floors begin with a short diagnosis. If the discoloration is mostly on top, a mild cleaner and brush are enough. If the grout stays dark after drying, or smells musty, you are dealing with absorbed staining or mildew and need a different approach.
That distinction saves time and prevents avoidable damage. People often scrub harder when they should actually switch products, shorten dwell time, or stop before they etch nearby stone. The floor usually tells you what is happening if you look at color, texture, and whether the grout lightens as it dries.
| What you see | Likely cause | Best first fix | What to avoid |
|---|---|---|---|
| Gray or brown film across many joints | Tracked dirt and cleaner residue | Warm water, pH-neutral cleaner, nylon grout brush | Starting with acid or undiluted bleach |
| Chalky haze near showers or mopping zones | Soap scum or mineral film | Soft alkaline paste or oxygen bleach solution | Oil-based cleaners that trap more soil |
| Dark specks or patchy black staining | Mildew on damp grout | Targeted mildew cleaner plus full drying afterward | Sealing before the grout is fully dry |
| Uniform deep discoloration that returns after cleaning | Absorbed staining in unsealed grout | Oxygen bleach, repeated passes, then sealer | Assuming one quick scrub will reset the color |
That is the detail most short guides skip. Dirty grout is not one problem with one magic product. Once you separate surface grime from absorbed staining, the rest of the job gets much more predictable.
The safest step-by-step routine for most tile floors
The safest routine for cleaning grout on tile floors is dry soil removal, a mild pretreatment, gentle scrubbing, controlled rinse, and complete drying. That order matters because wetting loose grit first turns it into slurry and pushes it deeper into the grout lines.
- Sweep or vacuum the floor thoroughly, especially along wall edges and corners.
- Mix a pH-neutral tile cleaner or a baking soda paste for light to moderate soil.
- Apply only to a manageable section, usually 10 to 20 square feet.
- Let the cleaner sit for 3 to 5 minutes, but do not let it dry on the floor.
- Scrub with a nylon grout brush at a slight angle so the bristles reach the joint without chewing the tile surface.
- Wipe with clean water using two passes if necessary, then dry with microfiber towels.
This routine covers what most kitchens, entries, and main bathrooms actually need. It is slower than spraying something harsh everywhere, but it is also the method least likely to leave a sticky residue or lighten the grout unevenly. A floor that dries clean usually stays clean longer.
Which cleaners are worth using and which ones cause trouble
The best tile-floor grout advice does not rely on one miracle cleaner. Baking soda, oxygen bleach, pH-neutral tile cleaner, and targeted mildew products all have a place. Vinegar, strong acids, and repeated bleach use are where many DIY jobs start going sideways.
| Cleaner type | Best use | Strength | Main caution |
|---|---|---|---|
| pH-neutral tile cleaner | Weekly or monthly maintenance | Low | May not lift deep stains alone |
| Baking soda paste | Light grime and spot cleaning | Low to moderate | Needs dwell time and rinsing |
| Oxygen bleach solution | Darkened porous grout and dingy traffic lanes | Moderate | Follow dilution and rinse well |
| Hydrogen peroxide-based cleaner | Organic staining and bathroom grout | Moderate | Test first on colored grout |
| Chlorine bleach | Short, targeted mildew treatment only | High | Can weaken grout and irritate lungs |
| Vinegar or acidic descaler | Only on specific compatible surfaces | Variable | Unsafe on natural stone and some sealers |
Oxygen bleach is often the best middle ground because it lifts organic grime without the harsh smell and repeated surface stress of chlorine bleach. The bigger warning is acids. If your floor includes marble, travertine, limestone, or another calcite-based stone, an acid cleaner can dull the finish faster than the grout brightens.
“How do I clean this grout and preferably keep it clean? It is not sealed grout.”
— r/howto, August 2022 (264 upvotes)
That r/howto thread is useful because it captures the real temptation behind dirty grout: people want the fastest visible result, even when that points toward stronger products such as bleach-based gels. Those shortcuts should stay targeted last resorts, not the default plan. Ventilation, tile material, grout color, and dwell time all matter before a harsh cleaner touches the floor.
How to handle heavy buildup without damaging the floor
Heavy buildup needs repeatable passes, not panic-level scrubbing. When grout is deeply discolored, the safest approach is usually oxygen bleach, longer dwell time, short sections, and multiple rinse cycles rather than one aggressive chemical hit.
Mix the cleaner exactly as directed, work in sections, and keep the surface visibly wet during the dwell period. Then scrub, wipe, inspect after drying, and repeat only where needed. The visual change often looks modest while the grout is wet, then clearer once the joint dries out fully.
This is where patience matters more than brute force. Cement grout is porous by design, which means years of mop water, body oils, soap residue, and tracked soil can settle below the surface. When that embedded staining starts to release, it rarely does so in one pass.
The biggest mistakes that keep grout looking dirty
The most common grout-cleaning mistakes are over-wetting the floor, skipping the rinse, using the wrong brush, and sealing too soon. Each one leaves the grout either dirtier than before or more vulnerable to the next round of staining.
- Using a wire brush or abrasive pad that roughens the grout surface.
- Mopping dirty water back across the floor after scrubbing the joints.
- Leaving detergent residue behind, which attracts fresh soil quickly.
- Using steam repeatedly on already weakened or cracked grout.
- Applying sealer before the grout has dried out completely.
The rinse step is the one people underestimate most. If the loosened grime and cleaner stay on the surface, the grout looks brighter for a day, then turns dingy again almost immediately. That bounce-back is frustrating because it feels like the cleaner failed, when the real problem was the cleanup after the scrub.
When to seal the grout and how to keep it cleaner longer
Freshly cleaned tile-floor grout lasts much longer when it is resealed after a successful deep clean. If water darkens the grout quickly instead of beading for a moment, the joint is probably unsealed or the old sealer has worn away.
Wait until the grout is fully dry, often 24 to 72 hours depending on the cleaner used and the room humidity, then apply a penetrating grout sealer made for the grout type on your floor. That does not make the floor stain-proof, but it slows absorption and gives you more time to wipe up spills before they settle in.
For maintenance, the simple version works best: vacuum first, use a mild cleaner, dry the floor after wet cleaning, and tackle dark spots before they spread. Floors stay respectable with routine attention. They become restoration projects when every mess gets one more week.
FAQ
Can I use vinegar on grout every time I clean?
No, vinegar is not a universal choice for routine grout care on tile floors. It can be too aggressive for natural stone nearby, can affect some sealers over time, and is unnecessary for routine maintenance on most ceramic or porcelain tile floors.
Is steam cleaning safe for grout lines?
Steam can be useful on light buildup and well-bonded grout, but it is not the first choice for cracked, aging, or already weakened joints. Too much heat and moisture can expose fragile grout that was holding on by habit more than strength.
Why does the grout look clean while wet but dirty when dry?
That usually means the staining sits below the surface or there is still residue left behind. Wet grout temporarily darkens and disguises uneven color, so the real result only shows once the joint dries completely.
How often should I deep-clean grout on tile floors?
Most busy tile floors need a true deep clean every few months, not every week. Weekly or biweekly maintenance with a mild cleaner is usually enough between those deeper sessions if spills and tracked dirt are handled early.
Final takeaway
The grout cleaning tips for tile floors that work consistently are the ones that start with diagnosis, use the mildest effective cleaner, rinse thoroughly, and finish with drying and sealing. Once you stop treating every dark grout line like the same problem, the floor starts improving faster and staying that way longer.
Most Viewed